Greetings from Hummingbird Hollow! Have you missed us? We certainly have missed sharing our story with you! Our last blog post was nearly seven months ago. We have been busy bees here and much like our honey bees, now that it is winter, we will have plenty of time to be inside, stay warm and blog! Not a week goes by without someone asking, "when are you posting on your blog again?" So, for our diehard readers...this is the room you (and we) were waiting for...the master suite!
Master Bedroom
Unfortunately, Ted likes to go swimming in the pool with his phone in his pocket so most of the Master Bedroom pictures progress pictures were lost. We do have a few pics from when we first purchased the home so one can definitely see the progress that was made. This room was used for storage for the first two years of the project. Every time Abigail cleared it out or organized it, we piled it high with more boxes or tools as we made progress in the rest of the house. This combination master bedroom and bathroom turned out to be the longest project in the house but well worth the wait.
 |
| Wire lath and plaster, oh what fun! |
Once the room had been cleared out it had to be taken down to the studs on fireplace side of the room. We also removed the ceiling and installed new insulation and sheet rock. To finish demo we took out a small closet to add a reading nook for Abigail next to the fireplace. Our original reading nook in our main window has been overtaken by our two dogs, so this is the next best location. Who doesn't love snuggling up with a book next to a fire? This home had many additions over time which in some areas made the home feel like a labyrinth. In order to get to the rear bedroom one had to walk through a bedroom to get to it. That was pretty much how the entire house felt when we first bought it. Since we wanted a second shower anyway transforming these two rooms into the master suite made perfect sense.
Finally we were ready to begin our design. We removed the plaster from of the fireplace and prepped it for a custom mantel which we made out of a reclaimed beam in the soon to be master bathroom.

Abigail had a Pinterest page for our home from the very first time we visited it that hot August day. One of her pins included two vintage doors. Since our home has small doorways in the original rooms, we knew that this entrance way was perfect for vintage doors. Abigail and I are both Craiglist junkies on the weekends. We search for antiques and vintage finds because you never know what you might need until you look on Craiglist! Well...we knew we needed antique doors and it just happened that on the very first search, these doors from France fell into our lap! These beautiful and handcrafted doors were a family heirloom that was brought here three generations ago via passenger ship by a family who lives nearby. They could not find a use for these gems that were being stored in their attic. Luckily for us, we had the perfect spot for such beauty.


Since we lost so many pictures of this room when Ted took his phone swimming we will just have to give you a description of what came next. First we sanded and lacquered the original floors which came out just as beautiful as all of the others in the house. Next we build the reading nook to the left of the fireplace complete with a bookshelf, storage bench, sconces and a power outlet near the mantel for the TV and of course Abigail's Christmas lights for the mantle. Next we installed ship lap only on the wall connecting the bedroom and bathroom. Once that was complete, we whitewashed the brick on the fireplace because the existing brick was extremely red. The red was making a statement that we didn't wish to make. Today when people say "white wash" they typically mean they painted with a diluted white paint, not us! As if it were 200 years ago we mixed hydrolyzed lime and water to create a true white wash and applied six coats to get our desired look. We also had to hide the neglected mortar and plaster walls that were above the brick. To accomplish this we used bead board to frame out the television and made a mantel using a beam that we had taken out of the bathroom ceiling. It certainly helped cozy up this area and now anchors the center of the room with sophistication.

We had been searching for quite sometime for light fixtures for the master suite and finally we found what we wanted however, they were bronze and we wanted them to be pewter. There are five different types of these in master suite so Abigail and her Mom meticulously took off every single crystal one by one so that Ted could hang them in the barn and paint them before they put back all of the crystals. Pain staking work but the result was worth it.
The only thing remaining was Abigail's magic decorating touch!
Master Bathroom
When we saw our home for the first time and we were considering purchasing it we aptly named this room the "Dexter Room" after the HBO series Dexter. If you have seen the show you will know why after seen the pictures below!


The reason the plastic was there was because the previous owner was an elderly widow who lived alone and her caregiver decided to insulate the room above where she slept to help keep some heat in. (The home had no insulation at all). We assume their thought was that plastic was faster to install than sheet rock. We didn't mind since we knew that we were going to completely gut the house for insulation however, our bank did mind. After the inspecting they required the walls to be sheet rocked for fire proofing. This was slightly annoying because 1) we had to do it before we could close which was a little bit of a risk and 2) we knew we would be just tearing it back down! Some time you have to do what you have to do so we enlisted the help of the Wilson men! Both of Ted's brothers as well as his father helped install the sheet rock one night after work.
 |
| We love our "Jersey Stairs"! |
You can see in the picture above an below that there was original hand painted wall paper! It was such a shame that we needed to remove this but it was all badly water damaged.
When we removed the plastic and insulation form the ceiling we discovered the original tin roof which had been build over with a modern roof with a steeper pitch. Finding things like that are amazing. We carefully removed it and salvaged the tin and wood for some future projects.
 |
| In this picture you can see the old roof |
 |
| Here you can see they had to cover a window with the new roof |
Next we removed the plaster from the wall connected to the bedroom to make way for the shower plumbing. We also used spray foam on the ceiling for insulation (which can be seen in a previous blog post)
 |
| New framing to make room for our shower plumbing |
Now we had a large open room with a 16' high vaulted ceiling. The issue was the ceiling joists were low (about 7' from the floor) which would not look right if we kept the vaulted ceiling. To fix this we consulted with two friends (an architectural engineer and a framing teacher at a vocational school). The consensus was to build new walls on each side which provides extra support. Next, in order to raise the ceiling joists we needed to add collar ties to the top third of the roof. Then we cut out the ceiling joists one by one and raised them up 3' to the limit of the bottom third of the ceiling. The illustration below is what we followed. All collar ties, as well as, rafter ties were lag bolted in. We are confident in the strength of our roof, in fact it is stronger now than it was before.
 |
| The collar ties gave the added benefit of acting as a chase for our air conditioning |
Next it was time for sheet rock which was tons of fun cutting around the rafter and collar ties. Also nothing is square in a 200 year old house.


Just when I think that the hard part is done, Abigail throws in her ever-changing design ideas. Like every room in this house, Abigail says, "don't worry, this room is a simple design." When those words are uttered, one should be warned that things are about to get complicated. For instance, she has always liked the look of corrugated metal roofing on barns and farm houses so somehow she decided, "let's use that as our ceiling!". I explained to her that no only is gravity a problem since the roofing is designed to go on a roof and not a ceiling but it would be nearly impossible to get a clean look cutting around all of the beams, ceiling vents, bathroom exhaust of chandeliers. Then Abigail played her ace in the hole..."you can do it, you're Ted, you can do anything!" Needless to say now I had to do it! (Well played Abigail) But, with all her designs, I trust that the cuts, the crazy measurement and the time are well worth it. If you continue to read on, you will see that he vision was spot on. Nothing else could have wowed the eye above those beautiful beams other than the metal ceiling.


When we finished installing the metal ceiling it looked so amazing (even though no trim was up yet) Abigail decided that regular sheet rock would be too boring in contrast and that we needed more texture in this large space. With that being said, Abigail channeled her inner Joanna Gaines (from the show Fixer Upper), and in came the shiplap! But, she didn't want to go with the traditional creamy white shiplap that everyone uses these days. Nope, we went with our favorite color....blue! There are so many shades of blue in this house that even when we think we are being daredevils and choosing a new color; there's always blue mixed in! However, this time, we couldn't decide on the blue that we wanted and ended up mixing our own custom color to fit this room just right. And if you have already snuck a peak at the flooring, you know that we also wanted to pick something to make the amazing floor tiles pop!
We found an easy way to mimic shiplap at a fraction of the cost using strips of plywood so we enlisted the friendly employees at Lowes to cut them for us. To be considerate we split the cutting across three different visits (14 sheets of plywood had to be cut into 8" strips). By the third trip the guy who helped us was making jokes asking if our company offered benefits since he was pretty much our employee now!
Next up was the shower. Since we wanted the shower floor to be tile as well as a seamless transition to the wall tile we had to build and pour our own custom pan which is exacting work. The pitch must be consistent and the pan must be water tight with built in fail safes. Nothing is worse than spending countless hours on a custom shower and tile then time goes by and the ceiling below begins to leak. In that case you must tear out the entire shower pan an start again. Needless to say we took our time on this!
The first step of a custom shower pan is installing the bottom of the two part shower drain. Then we poured our first layer of concrete making sure to evenly and gradually slope towards the drain.
Next, we installed a water proof membrane and locked it down to the plumbing. For inspection we plugged the drain and filled the pan with water. Once filled we marked the level with a sharpie on the side of the wall and let sit for 24 hours and checked the level against the mark. No leaks!
To complete the pan we screwed in the drain and poured a second level of concrete over the membrane while paying close attention to the slope.
We felt that a recessed shelf would give more room in the shower than any shelves or dishes.
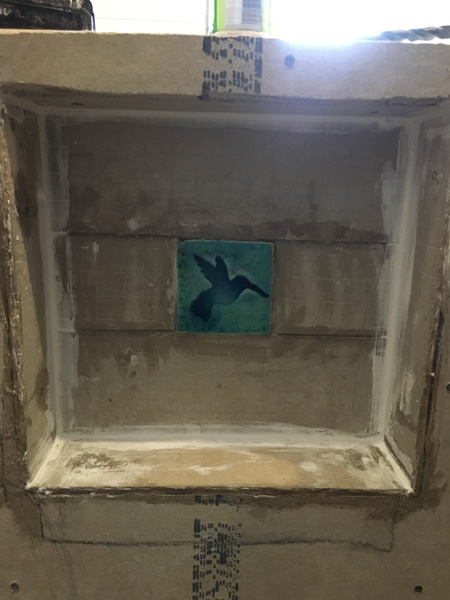
Abigail and her mother found this handmade tile at the Philadelphia Flower Show last month when they went on a girls trip to get inspiration for gardens at the farm. Abigail did not come home with a single flower! Instead, she came back with carefully chosen designs that were handmade (something we can definitely appreciate). I happened to be working on the tile wall the day that Abigail texted a picture of this hummingbird for our design. She search these tiles that were made from wine bottles for almost 15 minutes determined to find a hummingbird. Right when she was ready to give up, there it was...the perfect accent to Hummingbird Hollow.
 |
| We know what you're thinking... and yes, the wall tile was difficult! |
Now it was time for the floor tile. Abigail found the tile she loved but I explained to her that the floor needed to be small format tile to follow the pitched floor but the tile she picked was 12"x 12". Abigail's solution? "Can't you just cut these tiles in to individual tiles... you're Ted you can.." Even though I had caught on to her trick by now that's what we did and it looks amazing.


Neither of us ever had closets that could fit all of our clothes at one time. We always needed to pack things up for the different seasons so that we could keep things organized. Our goal, with this carefully thought out design was to relieve ourselves of ever having to do that again. We also wanted enough storage for shoes! We both new exactly what we needed to make our closet function for us. Abby was excited for shelves to organize her shoes and glass shelves so that she could easily see which jewelry she was going to wear for the day. I was looking forward to a closet tall enough to hang my clothes so they wouldn't wrinkle and plenty of space to hang pants.


We couldn't just leave our clothes on display in the bathroom even though it would have made choosing an outfit from the shower or tub very easy. Instead, Abigail wanted sliding farm doors. If you have been keeping up with our blog, I have been making doors around our house throughout our renovation, but we never got around to making those trendy sliding doors that everyone uses these days. However, this "trend" is really just an inspiration from our very own barn doors. Don't be fooled by this picture...these doors are just primed. Abigail never leaves anything white in this house but that's probably just because I'll get it dirty!


Abigail must have come up with ten different design ideas for how we could transition the bathroom to the stairwell that enters the room from my study. When we purchased the home, there was no railing at all, so we had little to work with. However, during Abigail's chemotherapy, we had been watching HGTV with Nicole Curtis (Abigail binge watched almost every HGTV show during chemo and that paid off) and we saw her use an old barn beam with chicken wire to create a nice rustic railing. Since we have had no shortage of beams, we used the original hand hewn center beam from this rooms ceiling, that we removed, and this railing was born! It is extremely sturdy and nothings better than to be able to use materials from our very own house!


When we installed the closet doors the track had to be mounted higher than we originally planned so the doors that we made ended about 4" from the floor. Instead of settling we took lemons and made lemonade! We used reclaimed brick from our farm and made an accent row under the doors. Talk about an awesome mistake!
As you can probably see from the pictures, this bathroom is BIG. With this much floor space the tile was certain to make or break the entire design. Abigail searched months ahead of time until she came up with the perfect tile. We used larger tiles and a pattern that would not compete with everything else in the room. We wanted it to be a showpiece yet subtle. Not sure how our readers will feel about the tile but I can tell you we are head over heals for it!
Abigail had her heart set on turning a piece of furniture that came with the house into our master sink. This buffet had been stored in the attic when we first purchased the house. It had been covered in dust but Abigail saw it's potential long before the dust had cleared. After some minor alterations it fit perfectly and the plumbing began.


The final project to be completed before we began decorating was the bathtub. No one likes taking a bath more than Abigail so from day one we knew a large claw foot tub was a necessity. The only thing Abigail may like more than a bath is a Jacuzzi or hot tub. One night as Abigail was searching the internet for tub options she came across the best of both worlds... a jetted claw foot tub! We found one we liked but we were two years away from needing it, so I just used the dimensions to do the plumbing and we went on with the rest of our home renovations. Then, when it was actually time to purchase the tub, we found out that the company didn't even make that tub anymore! Luckily, after many Google searches, we were able to find our dream tub once more, however, murphys law kicked in and we had to cut open the ceiling below and move the plumbing over about 6" to center the new tub.
As you can see below, it took some careful planning to get the tub into the house. When we first planned the tub, we had a house that was taken down to the studs. However, when we were finally ready for the tub, we had walls, doors, and a house full of furniture! We built a frame the size of the tub just to make sure we would be able to get it up the stairs, around the corner and in to the bathroom.
Finally it was time for Abigail's decorating magic! We will let the pictures of the finished product speak for themselves!
When we look at these pictures or even when we walk through those old french doors, we catch ourselves in disbelief that we live here. This was the final room to be completed in the house and we are both so grateful to have so many of you are taking this journey with us. Living in this house is truly our dream come true and we certainly have a new appreciation for what it means to have a Fixer Upper. While the inside of Hummingbird Hollow is now complete, there's lots more to come as we take on new adventures and we hope you'll join us once again as we take on our next exciting project!