Spring is here!
Within a matter of weeks, our farm has gone from a sea of brown trees and grass to a rainbow of foliage and flowers.
 |
| We planted the tulip and daffodil bulbs in December. The ribbon plants were original to the farm. |
Even though our farm has enough flowers, shrubs, and ground cover to open a small nursery; it is largely wild, sporadic and unkempt. This is where Abigail comes in! Abigail and her parents have transplanted hundreds of flowers and shrubs from various locations on the farm in to newly planned garden beds along the driveway, barn, outbuildings, and farmhouse. She also thinned out our gardens at our Bethlehem, PA home before we sold it (yes, we were under contract within 48 hours and we will close this week). We took several bins of flowers with us to be planted at the farm.
Since the farm had not been cared for in the past ten years, we spent many weekends cutting out dead trees and weeds. We hauled it all to the back field to burn (In New Jersey, provided you have the required acreage, you are allowed controlled burns with a permit for herbaceous plants).
We cleared most of the driveway on both sides (minus actual trees) because it was mainly weeds, pricker bushes, leaves, barbed wire fence (for cattle at one time), and various other old rusted metal fencing. This took a solid two weekends and that was with plenty of help.
 |
| We bought a truck for the farm, and yes... it has flames. Abigail isn't a big fan but the price was right. It is a 4x4, has the farm bed rails already and is lifted ( which is perfect for driving though our fields). |
 |
| This picture is from the first day of clean up. The pile is much bigger now and we have multiple (kept at a distance from one another for fire safety). |
Once we finished clearing, Abigail and her Mom began transplanting all of the flowers and shrubs mentioned earlier, to the cleared areas (I just realized we don't have after pictures but once everything grows I am sure we will post again). Here is the only before and after I could find from a few weeks ago (the flowers are much fuller and taller now).
Other than planting, we have been busy painting and repairing fences, cleaning up construction debris and mowing what we can for now. Here are a few more random pictures to conclude the outdoor section of the post.
 |
| Mummy painter |
 |
| We have been been spotting tons of residents of our pond including: turtles, bull frogs, various fish, otters and two geese who must have a nest because they refuse to leave. |
Moving
As planned, we put our house in Bethlehem, PA up for sale just before Easter to take advantage of the spring market. It worked! We were under contract at asking price withing 48 hours. Closing was supposed to be last Friday but, of course, was delayed to early next week due to paperwork delays. Since there were only 45 days between listing our home and our closing date, we had our work cut out for us packing up all of our things and repairing all of the items requested by the buyer's inspection and the town's CO inspection.
Those of you who follow this blog regularly are probably wondering why we sold our house before our farm house even had walls! Luckily, Abigail's parents live only five minutes from our old house and have an independent guest suite on the second level that we have temporarily moved into. We rented a Uhaul, moved all of our furniture and belongings to the farm, and absolutly filled our four car garage.
Finishing the basement - 75% done
In our last post, we had just completed the finished floor level with foam board insulation and the vapor barrier. The next step is getting ready for the concrete slab pour. In order to ensure the slab will never crack, we installed a raised grid of rebar. It also doubled as a base to suspend our radiant heat pex tubing (that's right....even our basement floors will be toasty warm :)
 |
| I only had to drive a few miles on the back roads with my jousting truck! |
 |
| The completed grid is raised about 1" with two heat loops wire tide down. We also spray painted the walls yellow at the center of the support columns since they would be buried after the pour. |
 |
| We ordered all of our thermostats (there will be seven radiant heating zones in the home) so that we could set the thermostat in-floor temperature probe before each floor is poured) The thermostats are pretty advanced. They will maximize efficiency using a formula which takes in to account 1) floor temperature 2) room ambient temperature 3) outdoor temperature and 4) barometric pressure change (which anticipates temperature shift) |
Once were were fully prepped, we contacted our concrete contractor and cement yard to schedule the pour. Everything went as "smooth" as can be and we are very happy with the finished product.
 |
| They poured the first half from an old window that we left open temporarily for that reason |
 |
| Then, we poured the second section through the bilco storm doors. Eight yards of concrete in total. Also, though you can't see it in the pictures, we paid extra for a fiberglass additive which increases the strength of the concrete. |
 |
| They worked the concrete to a rough thickness of 4" |
 |
| Then, they used a large concrete float to finish. I have done concrete pours in the past myself and it was the most stressful rush against time as the concrete set. They were definitely pros, laughing and telling jokes as the smoothed it to a perfect finish. |
 |
| After they let the concrete set up for around an hour, they went back and hand finished while kneeling on foam pads. Typically, concrete contractors use a finishing machine which is a little like a floor polisher and is much easier than finsihing by hand. They actually had the machine in the back of their truck but said that they don't use it when the slab is poured over foam insulation because it can shift and crack while finishing. |
 |
| The finished floor! |
The pour was on a Wednesday so by Saturday we were ready to build the walls! The 2" xps foam board on the walls pictured above acts as a semi-impermeable vapor barrier as well as r-10 of insulation. Against the foam board we built 2"x 4" walls which we will insulate with r-13 fiberglass insulation before sheet rocking and spackling.
 |
| Trip #2. We used 120 2" x 4"'s and 40+ boards of 5/8" sheet rock (which is not light!) |
 |
| Controlled chaos |
 |
| On the left is our sewer ejector pump basin (necessary because we would not achieve adequate pitch from our newly installed master bathroom) and the radon extraction system pipe is on the right. We need to cut a 4" hole through the foundation to the exterior and elbow the pipe outside where it will meet the extraction fan. |


 |
We officially have cold water to every fixture in the house! Next weekend we plan on installing a new hot water heater and connecting it to the manifold.
Radiant heat gypsum pour
There are four rooms in our farm house that we did not want to save the floors. Two of them are over small crawl spaces (kitchen and den) and two had refinished sub floors already (guest bath and master bath). In the rest of the house, we used staple up underfloor radiant heat (which can be seen in earlier posts). Above floor radiatn heat is actually more desirable and heat efficient, however, the material for the pour is a specialty product and is quite expensive. After we made a ton of calls, no gypcrete company with a pump truck wanted to do our job because it was only 800 sq/ft total. We had one contractor give us a quote to mix the bags by hand and we nearly fell out of our chairs! So, we decided to do it ourselves. So far, we have only completed the half bath and the guest bath. We started with these because they are the smallest rooms and ideal for practicing. In the end, it wasn't terribly difficult, though it was labor intensive, and it came out beautifully.
|
 |
| We sectioned off the areas we wanted to pour including areas which will not have foot traffic or radiant heat such as around toilets and under cabinets. We will pour regular concrete there ($3 per bag vs. $30 per bag!) |
 |
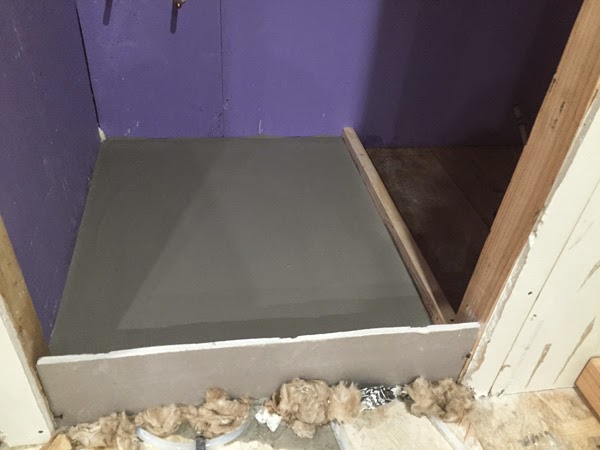
Guest Bath: We had to install sheet rock as flow boarders and spray foam and caulk all the cracks so that the watery mix wouldn't spill out.
|
 |
| We paddle mixed the material in a 30 gallon mixing barrel (aka - garbage can) |
 |
| Then, starting at the back, dumped mix by mix and finished it to a height of 1.5" with a leveling rake. |
 |
| A messy job |
 |
| Finished product while wet |
A special thank you to our family
Both of our parents have helped us so much at the farm. Every weekend they are there by our side helping one way or another. They are making this journey so much easier on us and we want to say thank you. Here are a few action shots:
I wasn't able to catch my mom in a picture (probably as she wanted) but she cleaned up our entire farm of construction debris and various garbage that had blown out of our dumpsters all winter. Part if our reasoning for taking on a project like this was because the farm would promote memories and time shared with our family and friends.


