As we prepared to make this post, we went back and read our blog from the very beginning. It feels surreal thinking about the progress we have made in seven months by only working weeknights and weekends. Our goal is to move in by September 1st, 2015. The house will be far from finished, however, our plan is to finish half of the interior and work on the other half while we are living there. Once we are living in the finished half we will be able to wake up or come home from work, put on our construction hats and walk through our dust proof construction zipper doors into the unfinished space and continue working.
Since it has been over a month since our last blog there is a lot to cover. We will try to keep the narrative to a minimum because there is a ton to see!
Our first finished room!
Since the day we started planning our renovation, we knew that the half bath (powder room) off of the kitchen would be the first room to be completely finished. Perhaps, because it is only 18 sq/ft, but as you will see, beautiful things can come in small packages! The half bath's size and location are original to the house, however, that is where the similarities end. As you may have seen in earlier posts, we completely gutted the bathroom including the floor, plumbing, insulation, and a bath vent before installing mold resistant sheetrock (purple).
After three coats of spackle, we sanded and primed the walls. Next up... tile! We were very excited about our very first piece of finish work to be completed in the house. We choose a period appropriate tile in porcelain white hexagons.
Since we are, for the most part, making up our design and changing our designs on the fly, occasionally we have to take a step back in progress. It can be time consuming and frustrating at moments, but we refuse to compromise on quality of work or our vision. We already have two examples of this in the first room we are finishing as shown below.
 |
| We decided to go with a floating (no legs) rectangular sink to save space and achieve the look we were going for. Once we opened the sink bo,x we discovered that there was no mounting brackets and no holes to affix the sink to the wall. We were forced to open up the finished wall to install backer studs to accommodate the custom brackets we would need to install. |
 |
| Next, we designed and installed box molding with 1"x 4" pine. We considered traditional box molding but we felt this look was more traditional to a farm house. |
 |
| We then installed 3/4" 1/4 round to finish the inside of the boxes and added an accent tile above before capping it with accent molding. |
 |
| But.... we weren't happy with the result so we ripped off the completed accent molding that we had just installed and went back to the drawing board. |
 |
| We are MUCH happier with our second attempt. We installed another 1"x 4" and capped it with a thick bull nose. |
 |
| Our vision really started to come to life as we put on the first coat of paint |
 |
| We made custom floating sink brackets out of framing brackets. |
 |
| Even with the brackets, we had to drill a hole through the back underside of the sink and affix it with a 4" screw. Now it is very sturdy. |
Hot Water!
Once the basement walls were completed it was time for hot water!
I know... what a luxury! Even more exciting than hot water was researching and purchasing our high tech,
super green, GE GeoSpring Heat Pump Hybrid Water Heater. For the techies: electric water heaters are rated three ways 1) estimated annual operational cost per year 2) estimated yearly kWh use 3) energy factor (the higher the more efficient) A standard electric water heater sold today has the following ratings 1) $567 2) 4721 kWH 3) .93. Our GE GeoSpring is rated 1) $182 2) 1514 kWh 3) 2.9. A HUGE difference! Here is the catch- a typical electric water heater costs between $300-$600. The GE GeoSpring costs $1,200. Here is were it gets even better. Lowes had a weekend sale for $1,000 and the State of New Jersey offers a $500 tax credit on the purchase of any hot water heater with an energy factor over 2.0. So our total cost was actually $500. You will see MANY tricks like this with green technology in our blog. We plan on eventually being "net zero," which means our utility bill will be $0. But, at the same time, we wont break the bank accomplishing it.
Guest Bathroom and Laundry Room
The next project was beginning to finish the guest bathroom and laundry room. The guest bath is original to the house however, we gutted everything, changed the layout and added a separate laundry room. The washer and dryer were in the kitchen when we purchase the farm house. I guess designers didn't plan ahead for washers and dryers in 1825.
 |
| We installed Roxul sound proofing insulation on all interior walls of the laundry room to isolate the sound of the machines. |
 |
| The original exterior view of the kitchen (1st floor), guest bath and laundry (2nd floor) Rest assured we will eventually renovate the entire exterior. |
 |
| We cut two giant holes in our house to make way for new floor to ceiling windows. |
 |
| Building the frames- We used 2"x 8"s because we will be installing 3" poly iso foam board insulation on the entire exterior of the house. Therefore, the window frames must extend out 3" past the exterior studs. |
 |
| We have temporarily stapled plastic to guard against the weather while we wait for our special order windows to be delivered. |
 |
| Next up was planning the layout for the double vanity, This turned out to be quite the task especially because our design called for wall mounted faucets (which have zero tolerance for error). To further complicate things, there will be two vanity lights, two GFI outlets and two sinks; all of which must be exactly centered between the two new windows. Above, you can see our official architectural drawing using a piece of scrap sheetrock and a random pencil. |
 |
| We temporarily hung the mirrors and one sconce to make sure our layout worked and it did! |
 |
| Time for spackle |
 |
| We bought this utility sink used off of craigslist for $20. This will be our temporary sink for finish work. This was the first time we had running water inside the house since we began the renovation in November! |
 |
| Installing our deep soak tub wasn't as easy as it should have been thanks to our 200 year old un-level house! |
 |
| Many entries ago we showed how the inspector failed us for installing a "S" trap. This is the new and improved "P" trap. It was NOT as easy as it sounds but we were able to pull it off. |
 |
| Next we installed cement board for the walls of the tub surround as a tile backer |
 |
| Tile time! |
 |
| Then we installed the faucet and shower head |
 |
| This is as much of the shower fixture that we will install for now. The fixture also has a hand held wand and a large rainfall shower head. For now, this will do for showers after construction. I'm in heaven! |
Sanding 200 year old floors
We are not yet ready to completely finish our floor. However, we are at the stage where we will begin insulating (for the radiant heat) and sheetrocking the ceilings below the floors. We decided to
almost finish the floors so that all of the dust from sanding would fall freely through any cracks and down to the next level and not on to our newly installed insulation. I have refinished many hardwood floors in the past and have never experienced anything like this. We used a drum sander with the lowest available grit (24) and each room took 3-4 passes before we could step up the grit. We only did the three upstairs bedrooms and it took two 10 hour days of nothing but sanding and we didn't even do any edging. This wood was harder than I ever imagined. We were told that our floors are American chestnut.
 |
| The end result of the pre finish. We are so happy with the grain and the large knots! |
 |
| The rear bedroom is very old pine. The floor was in pretty rough shape but when we had our early American Archaeologist friends visit, they believed that this floor was the oldest in the house so we decided to keep it. It is an interesting floor (to say the least) with no two planks the same width or length. There are planks as wide as 24" and some as narrow as 3". |
 |
| We are glad we decided to save the floor after we saw what it looked like once it was sanded. There were a few areas that needed repair as seen above. |
 |
| During the initial demo of the farm house we salvaged any wood that we could. To repair this floor, we searched through our salvage pile and found a plank which appeared to be a good match in grain and color. I believe it was one of the original attic floor boards. |
 |
| We cut out the damaged area and ended each cut at a floor joist. |
 |
| Then, we cut the savaged wood to size |
 |
| Once we fit the newly cut replacement piece, we affixed it to the floor joists with period appropriate cut nails. |
 |
| Finally, we sanded the replacement piece. This would have looked out of place in any other floor, but, in this floor, it looks like a repair from 100 years ago. As you can see, we even intentionally did not square the far end to make it look like an old repair. All of the other existing repairs in the floor look similar. |
Picking up exterior insulation foam boards
We do not plan to begin working on the exterior until October, However, we came across a deal that was just too good to pass up. We decided from the very beginning that we were going to go very green with our renovation. An integral part of that is to insulate the house far better than normal. It was our plan to use 4' x 8' 2" poly iso foam board on the entire exterior of the house over top of the fiberglass insulation. This will add 13 to the r-value as well as eliminate thermal bridging (thermal bridging is heat loss through studs in the wall which have little to no insulating value. The only down side is each board retails for $32 per 4' x 8' sheet. Luckily, one day, we randomly decided to check craigslist for foam board insulation. To our surprise, we found 3" poly iso boards for sale in north central PA for only $15 per sheet! That's 50% more r-value than 2" at more than half the price! We immediately called and found out that the seller had salvaged them off of a temporary commercial building. They were all like new except for a few nail holes. We immediately rented the largest U-haul we could find and went to pick them up! All 117 of them!


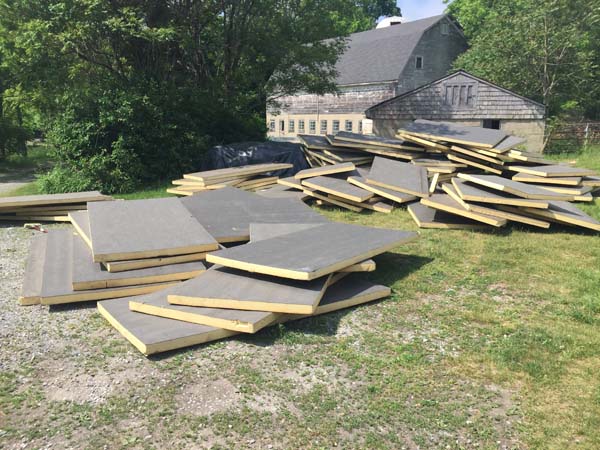 |
| This is what happens when you have to unload the boards yourself when its 8pm at night and you have to return the truck. |
 |
We neatly stacked them in one of our barns the next day for safe keeping.
Kitchen
Since we have "finishing work-itis, we also started concurrently finishing the kitchen (mostly because we are beyond eager to install our kitchen cabinets). But, before we can install cabinets, we need a floor! Just as we did the half bath and guest bath, we installed the radiant heat tubing and poured self leveling gypcrete.
The original kitchen had three large windows which we really liked because it brought in so much natural light. Unfortunately, the windows were very old and single pane (non existent r-value) so we decided to tear out the old windows and replace them with a modern, yet equally large, triple casement window
For the engineers and the construction savy: Right now, you are looking at the picture above and thinking holy ....! Is that a 2' x 4' header? And worse yet, on its side? If you look closer on the left and right of the opening, you will see two heavy duty steel I-Beams. The header is another I-Beam resting on top. So yes, it is structurally sound!
Once the windows were framed, we were able to sheetrock the remaining walls.
Next up, was tackling the dreaded kitchen ceiling. We decided early on, that we wanted to leave the original ceiling beams exposed in the kitchen. The issue, which made that difficult, was our radiant heat for the room above, as well as, trying to fit lighting. With great difficulty, we accomplished our goal. Normally, insulation would be installed under the radiant heat to force the heat up. A common misconception is "heat rises," which is false. In reality, cold falls, which displaces heat up. Since there was no room for insulation in our exposed beams, we used a reflective foil to create an air pocket which will reflect the heat up into the room above. After we installed the air tight foil pocket, we sheetrocked and trimmed between the exposed beams before finally spackling and painting.


Landscaping
Despite Abigail's efforts to pull, trim, transplant, and prune during April and May, this 200 year old house sure puts up a fight! Many of the existing gardens around the farm were thinned during the Spring months to help spur growth to plants and shrubs that had been neglected for many years. Fortunately, this worked and the original plants and transplants are thriving! And unfortunately...it created an even bigger project to tackle after two weeks or non-stop rain. Luckily, Abigail, her mother, and her brother, Patrick were up for the challenge and have tamed these unruly flowerbeds once more.
|

The pool shed had been taken over by green giant hosta and weeds. You could no longer see the beautiful ground cover, purple iris, or salvia buried under.
The garage had one been home to several rhododendron but they had been diseased or strangled by poison ivy. We manage to save one and planted two new ones. We also removed poison ivy (poor Abby) and have started a new flower bed complete with flowers from our old house and one's given to us by our aunt and uncle.
Abby and her mom planted these two flower beds around the trees in the Spring and everything is growing in nicely. Now it is time for mulch and a rock border.
Abby's brother, Patrick, collected and washed the shale that we salvaged from our basement project to create beautiful borders around all of our gardens.
These rose bushes have seen better days and this poor lilac bush needed some love. After two days of pruning, digging, and mulching; these plants are showing life again!
This is Abby's favorite spot on the farm because every month brings a new flower and new life to the backyard. The most exciting discovery was the clematis that Abby and my aunt found one rainy afternoon. Abby's dad started winding it around the fence on a Sunday and it has grown a few feet in only one week! Our goal is to wind it all the way down the fence by Labor Day!
By our next post we hope to have completed the guest bathroom, be well on our way to finishing the kitchen, have insalled all of our new interior doors, and install the new kitchen and guest bath windows!


