


Things are really starting to come together at our home. Much has been accomplished since our last post from only three weeks ago.This includes a lot of work in the kitchen, partially finishing the original hardwood floors, preparation for new exterior siding and scaffolding, and we hosted our very first get together with family and friends.
Kitchen
After we initially installed the cabinets and floor, we moved our attention to other projects in the home that would cause dust. Now that the majority of construction projects are finished on the east side of the home, we can start to finish room by room. For now, we are only finishing the east side and installing construction doors to separate the west side so that we can move in and finish the west side while we live in the completed side. As you can see, the kitchen floor became very dusty and dirty over the past few months as we finished construction in other rooms. We will not completely finish the kitchen floor (which will include polyurethaning the wood and grouting the tile) until the very end of this phase. However, we needed to clean the floor to prepare for the kitchen island.


We also finished the far area of the kitchen floor, which we had left unfinished until now because it was a high traffic area for completing the remaining construction work.
We finished cleaning and installing the floor just in time for our appliance delivery! We have saved a ton of money during our renovation by doing most of the work ourselves and shopping smart, which has allowed us the ability to purchase high end products when it makes sense (ie- appliances, geothermal equipment, etc.) One of these items is an oven/microwave wall unit combo. Both the oven and microwave have convection capabilities so Abigail is very excited to start cooking here.


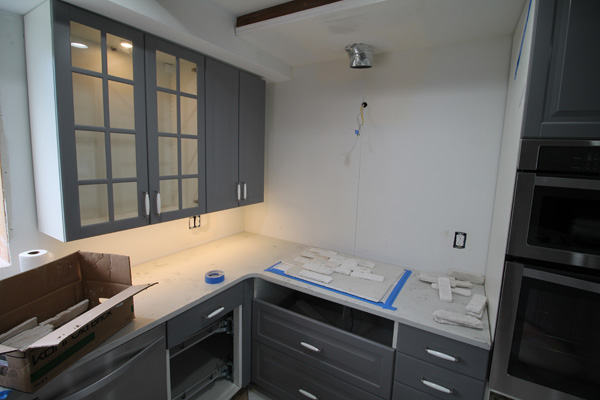
Next, we installed the island cabinets in preparation for the countertops. We planned ahead and ran an electrical circuit though the floor so that the island will have outlets.

Our countertops are an example of our "smart buying" mentioned above. We settled on a high end quartz countertop. But, since we have a large kitchen (75 sq/ft of countertop), paying retail would have been very tough on our project budget. We shopped around and finally found an installer in Queens, New York that would cut and install our counters for a fraction of the price(with a catch). We had to do all the measurements ourselves, fax it to them and take full responsibility if the measurements were incorrect. We wouldn't recommend this unless you are good with geometry and accurate with a tape measure. The drawings had to be even more accurate than usual because the walls are not exactly square and our farm sink and induction cooktop have an opening error tolerance of 1/4". But the most fun was brushing off my high school calculus to calculate the back side of the kitchen island. DISCLAIMER: all readers who make comments like "learning math is useless because you'll never use in real life" should skip to the next section so they don't get a headache! Mr. Galano (my calc teacher) would be so proud... SOH, CAH, TOA! We needed the opposite side of our known angle (22.5 degrees which we knew because it was half of the 45 degree turn). So, the Tangent of 22.5 degrees times the adjacent side (35") = the opposite side (14.5")

The installers arrived with their precut pieces and our math proved to be perfect.


Our induction cooktop fit perfectly and looks great! We are excited about the technology of our induction cooktop. If you aren't exactly sure how induction heating works, here is a quick lesson. Induction heating works using electromagnetism. The surface of the cooktop does not heat up but rather heats the pot or pan itself. This has a ton of advantages which include: 1) no chance of burning you or your child's hand since the surface is never hot 2) no chance of burn stains on the cooktop when liquids boil over so the cooktop will look new forever (see example pic below) 3) Faster and more even cooking. The speed difference is almost too great to believe. A gas stove takes 8:34 to boil 48 ouces of water while induction will boil the same amount in only 3:07. 4) It is incredibly, more energy efficient. Induction is able to deliver 90% of its energy directly to the pan, compared to gas, which transfers a mere 38% of its energy to the pan. This, not only saves a tremendous amount on your energy bill, but it doesn't heat up the entire kitchen when you are making a meal.
 |
| No words needed, this is just too cool! |


 |
| We couldn't be happier with the outcome |

Since this process has taken over 9 months, here are a few before and afters to put our progress into perspective.


 |
| The original kitchen |


Hardwood Floors
In one of our earlier blogs, we had done an initial sanding of the floors but that was just to remove the top layer of paint, stain, and who knows what other chemicals from the floor. It was also to prevent these layers from falling between the cracks onto the insulation and Sheetrock of the ceilings below. Now that the majority of the construction work is completed, it is time to completely finish the floors and seal them. Once finished, we will need to be very careful and cover all of the finished floors while doing any work.
The pictures below show the stages of refinishing wood floors. We will explain and give a few pointers in case any of you decide to take on refinishing your floors yourself. Professional refurnishers charge around $4-5 per sq/ft but would have charged around $6-8 per sq /ft for our floors. This is because of the hardness and age of our floors. Also, over time, most of the floor boards have "crowned" so the floor is not flat and therefor, is more difficult to sand.
The first machine to use is the drum sander. It is a big, heavy, machine with a large sanding belt. It is the most aggressive of all of the sanding machines and works great to quickly get the floor to a semi-finished state. The downside is it is the easiest machine to ruin your floor. Since it is so powerful, it will easily sand deep gouges into your floor if you stay in one place or lower it down too quickly. As long as you sand with the grain at a constant speed and ease the drum off and on to the floor with each pass while moving, you will be fine. Start with lower grits and work your way up to 100 or 120 grit. We started with 24 grit and made many passes in each room. We had to take off about 1/4" of flooring until the crowns or high spots were gone and the floor was flat.


 |
| The other machine we recommend renting is my brother :) |

The next machine is the edger. It is a heavy handheld machine that spins in a circular motion and uses 7" sandpaper pads. This machine is more forgiving than the drum sander, but can easily create swirl marks in the floor that will have to be sanded out later with a palm sander. It is pretty labor intensive because you have to be bent over on your knees while you sand all of the room's edges and any low spots that the drum sander can not reach. Just like the drum sander, we started with 24grit and kept increasing the grit with each pass, until we finished with 100 grit (24, 36, 60, 100 grit)


 |
| We uncovered some green wood stain in one old closet |
 |
| The hallways had to be sanded with only the edger since the drum sander is too bulky to fit in the tight space (this is a before picture) |


 |
| Just a few of the things we scraped out of the cracks |


 |
| This little guy (Praying Mantis) was watching me sand the hallway floors. I was on my knees and when I picked my head up. He scared the heck out of me but he didn't flinch. He even waited while I went and got my camera and was even patient enough for a lens change! After the photo shoot, I let him crawl on to my hand and I carried him outside to a tree. |


Finally, we applied polyurethane. We decided to not use any stain because the different species of wood throughout our house are works of art on their own. We are only applying polyurethane as a sealer and protective coat. Further, to maintain the most natural and authentic look, we went with a satin sheen so it is the lowest gloss available.
 |
| We were told by one guest that this floor may be chestnut but now that we have it sanded down, we are not so sure. Our other guess is hemlock. Does anyone know for sure? |
To apply the poly, we used lambs wool applicators and a t-handle. It is as simple as pouring a line of polyurethane on the the floor with the grain and applying it with the t-handle using a squeegee motion (back and forth and back and forth-working our way towards the door).


One we finished the first coat in the guest room, it dried with almost no sheen. The second and third coat provided a much higher sheen.
The second room we finished was the rear guest room. It is a completely different type of wood than the front guest room. We believe it is a type of pine. If anyone knows for sure, we would love to hear from you. Again, no stain, just satin poly.


Like the front bedroom, the wood really soaked up the first coat. A shine didn't appear until the second coat.
We applied a second coat in the same fashion as the first about six hours later. Between 6-8 hours after application, the poly is dry enough to walk on but still pliable enough to accept another coat without peeling. If you wait over 8 hours you will need to lightly sand the surface with 220 grit so that the next coat will bond and not flake or peel. Since the wood was no longer soaking up poly after the second coat, we decided that the third coat would be our finish coat. We let the second coat dry over night and then, using a palm sander, lightly sanded the entire floor by hand. This should always be done before the final coat to smooth the floor and will allow for a very smooth final coat.


After both rooms were sanded, we repeated the process of removing all of the dust using a tack cloth. This time, we first used a well rung mop and let it dry before one last pass with the tack cloth.
The finished product for the two guest rooms is breathtaking. The pictures do not do it justice. The floors definitely exceeded our own expectations.


Next week we will finish the hallways and living room.
Siding and Scaffolding
Another thing we accomplished since the last post was purchasing our exterior siding and scaffolding system for re-siding and insulating the exterior. We knew from the beginning that our dream would be to use James Hardie fiber cement siding. It is the Rolls Royce of siding. It is fireproof, impervious to rot and wood eating insects, is easily repaired and can be painted and re-painted just like wood. We knew it was for us but when we found out installers charge $10-12 per sq/ft for materials and labor, we were quickly discouraged (our exterior is about 3,000 sq/ft which would cost $30,000-$36,000 just for the siding and install. So like everything on this project, we decided to do the install ourselves. But even with that, the cost of the Hardie plank siding is 10x + that of vinyl. We pondered the decision for months until one day we saw a contractor's ad for overstocked primed hardie plank! After some negotiations, we wound up getting all of our siding for only $4.50 per plank! You can see the price at Lowes below!


Our First Picnic
So we rented a truck and headed down to Lancaster, PA to save over $3,000 in a night with a little sweat equity.
The truck was rated for 8,000 pounds and yet the mud flaps were dragging on the ground. Needless to say, this stuff is heavy!
The hardest part was unloading 400 twelve foot planks by hand. The planks weighed around 20lbs a piece. We bought all of the hardie plank the dealer had. Most of it is primed grey which is ideal for our future paint color but about 80 of them are primed white. White will still work, we will just have to prime it a darker color before painting once it is installed.
Our last awesome find of the month was an ex-contractor selling seven commercial pump jacks and roof brackets for only $200 which would be well over $1000 new. We will use these along with 24' 2x4s and 6-13' long scaffolding planks to remove and install new siding.
Our First Picnic
You know what they say, "it takes a village to raise a farm picnic"... or something like that ;). Both of our parents' and siblings helped us get ready for our picnic. We are very lucky to have them all.

We rented a 20x30' do it yourself tent.
There was plenty of yard work to go around. My brother weed whacked, Abby's brother trimmed and mulched, Abby's dad mowed, and her mom gardened.


My dad showed up really early on the day of our picnic and by the time we got to the farm he had already removed the old broken stairs to the barn's hay loft and replaced them with the original stairs from our basement. It's really cool that we were able to reuse them.


Using the re-purposed stairs, guesst were able to get their first look at the hay loft
While landscaping and getting ready for the picnic, my dad came across a huge slate rock that looked like it was being used to cover something up. It most definitely was! It was the original hand dug well! It's a little creepy but pretty awesome at the same time.


The picnic came and went without a hitch. It was extremely gratifying to have our friends and family share the day at our farm with us. Seeing all of the children and guests, all over the property enjoying themselves, reminded us why we took on this adventure in the first place. We received so many amazing complements on our progress and so many thoughtful and unexpected gifts. We are truly blessed to have so many wonderful people in our lives and look forward to more gatherings on our farm.

