

18 months ago we embarked on the herculean journey to restore and enhance our 200 year old dream home. Along the way there were discoveries, surprises, laughter, tears, excitement, worry... and life changing events. We have come so far and though we still have much to accomplish, we have just recently achieved our most important milestone... we have moved in! Abigail, myself and our two beloved dogs now call the farmhouse home <3
Since our last blog update, we have received the best news regarding Abigail and her cancer... Her last two scans came back completely clean. She is officially in complete remission!
We are still playing catch up with our blog updates which a few of our readers continue to bring to our attention! So we decided to work on an update while on our vacation in Myrtle Beach, SC.
So, without further adieu,
Our Dinning Room, Guest Bathroom & Garden
Dinning Room
The dinning room was one of the selling points in buying the farm for us. Imagining family holiday dinners at our 14 seat farm table, enjoying our home grown produce, and breaking bread while sharing and creating memories. We must admit, when we bought the farmhouse we really had no intention of going to the distance which we have with the architectural detail in each room. As we were working on the ornate hall and stairway moldings I remember Abigail saying "well, at least the dinning room and den will be simple!" She wasn't kidding, that was the intention. However, like every other room on the farm, once we begin a room, a flood of inspiration over comes us. "Let's do a coffered ceiling in the dinning room", she said, "thats the only extra detail we will do". Well that "only detail" took us a full month! Eight sheets of 4'x8' 3/4 MDF, six 2 lb tubs of putty, 580 feet of crown moulding, 70 ceiling tins and over 2000 finishing nails. It was worth it...

Before we could start work on the coffered ceiling every surface in the room needed repair (floors, walls, windows, trim, fireplace and electric). Also, during the process of restoring all of our other rooms, the dining room became the tool room and work shop. This was what the dinning room looked like up until about two months ago:

We began by cleaning out the room, chiseling the plaster off of the chimney brick, scraping / spackling the walls, and prepping for the coffered ceiling. The walls were smoke stained black from decades of burning wood in the fireplace as previous owners created their own cherished memories over the past 200 years.


Then, it was time to start the month of the coffered ceiling! First, we spent a good amount of time mapping out the ceiling grid so that the chandelier would be centered in the room and have the boxes fall evenly on all four walls. We used 3/4" MDF sheets ripped into 4" strips to make the boxes which we secured to 2"x 3"s that we screwed into the ceiling joists.


Once all of the boxes were installed, it was time for wood filler... a lot of wood filler. Even though our cuts were true and joints tight, each joint needed to be"eased" to give the appearance that the entire grid was made out of a single piece of wood. This took several coats and sanding each time. Also, we waited a week after we primed to allow the putty to absorb the primer which naturally causes cracking and then we applied a final coat of wood putty.


As the putty was drying, we began cutting and installing the crown moulding in each and every square. 4 - 2' pieces of crown per box = 8' of crown per box X 70 boxes = 560' of crown or 280 pieces of crown moulding we had to make! The cashier at lowes said "you must have a pretty big house" to which I replied "this is just for my dinning room" and that's where the conversation ended. I bet she was a bit baffled.


Thank goodness for our paint sprayer which we used not only on the coffered ceiling but also to paint the faux ceiling tins.


After two coats of paint, the decorative ceiling tiles were ready to be installed. We used a commercial construction adhesive to secure them inside all 70 boxes. At this point you may be realizing how exact our measurements needed to be when building the coffered ceiling. Each box needed to be the exact size of the ceiling tiles after the crown moulding was installed. In a few areas we needed to cut the tiles around electric fixtures and air conditioning vents.


We decided to keep the original fireplace surround and mantle but made one small detail upgrade to finish it off.


During the purchase negotiations we were able to keep some of the original furniture including this wall mounted china cabinet. We love the handmade glass and craftsmanship. We kept the cabinet in the same location but had to raise it about 12" to be able to fit our sideboard underneath it which compliments it beautifully.


After priming the entire room and painting all of the windows, doors, and trim, it was time for paint.


Below is a one minute time lapse video of me painting one wall. I actually recorded it to be funny because earlier that month one of my friends and I were discussing how much faster it is to edge using tape then by hand. Old school painters will disagree with me but I challenge them to a race and straight edge contest!
Finally, time to refinish the gorgeous original chestnut floors!


The floor was barely dry before Abigail began decorating and boy did she do a great job (as always). The table pictured is only temporary. This table was made by Abigail's friend Lisa and we intend to use it in a different room. Eventually, we are milling a 14 seat dinning table out of the original 18' floor joists that we reclaimed from the dens floor. (That's for another post)


 |
| Doodle loves pictures |


Guest Bath
In a previous blog entry, we had partially completed the guest bathroom. We were well on our way to completing it until we had a few days below zero and the sink pipes froze! This baffled us because that should have been impossible with 2" of closed cell spray foam between the pipes and the exterior. So we had to do some exploring... destructive, messy exploring.


Our Garden (Vegetable and Flowers)
Eureka, we found the problem! It was an air pocket behind the pipe. It must have happened when we were chipping off overspray while installing the sheeting. To be certian this was the problem we used an infrared thermometer on a very cold day. The inside surface of the spray foam was 68 degrees while the void behind the pipe was 14 degrees! We filled the void with spray foam and within and hour the pipes were thawed.
Once that was fixed, we completed all of the finish work in the bathroom including custom holders for our mirrors, towels and toilet paper using reclaimed wood from our house and black pipe that we painted an antique bronze.
Our Garden (Vegetable and Flowers)
We had already anticipated having a large garden but Abigial's cancer scare accelerated our plans and motivated us to grow our own food that we could be certain is 100% organic. Also, Abigial planned and planted two large cut-flower gardens. One is deer resistant flowers, which can be seen right outside of our kitchen window. We chose the east field for our garden because it is close to the house for watering, has flat and fertile soil, can be seen from the kitchen and guest bedroom, and is adjacent to the future location of our fruit tree orchard as well as our vineyard.


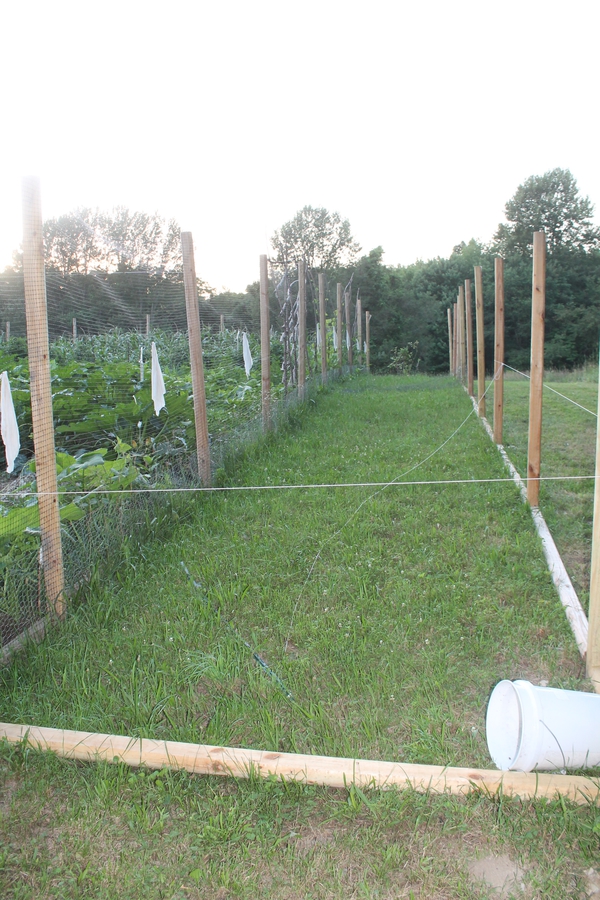


The garden is 40'x70' plus an additional 8'x70' which will be fully netted for our berry bushes. We fenced the entire garden with 8' landscape timbers, installed 8' netting (for deer) and also installed 3' chicken wire on the bottom (to keep out ground critters).
Luckily, with the purchase of our farm, we received a giant pile of complimentary donkey dung in the stable which we gladly relocated to our new garden and tilled it into the soil.
For good measure, we sprayed 100% organic fish oil fertilizer... which did not smell pleasant to state it nicely.
The white cloths that you see hanging from each section of fence is so that deer will be able to see the fence at night and not run through it.
And let the planting begin!!! Here is a list of the crops we planted this year (not in any particular order: Corn, 5 tomato varieties, cabbage, beets, radishes, cauliflower, onions, spinach, mesclun, green beans, cucumbers, bell peppers, jalepeno peppers, eggplant, spaghetti squash, yellow squash, zucchini, watermelons, melons, pumpkins, sunflowers, carrots, sweet potatoes, blueberry bushes, basil and parsley.
Seperate from the garden, we prepped and planted the cut flower garden outside of the kitchen window. Here are some pics from that process. (You will see the fruits of our labor at the end of this post)
 |
| There were a few rocks... |
 |
| We added a layer of peat moss to protect the seeds from birds |
Like everything at our farm, gardening is a family affair. Both of our parents constantly help with the vegetable and flower gardens. Our parents also grew many of the vegetables from seeds in their homes before the last frost.
As we said before, we are in the process of making a seperate section for berry bushes that is fully netted (including the ceiling) to protect the berries from hungry birds.
Every now and then we (mostly my dad) weeded to eliminate the competition for nutrients.
Here are a few pictures of what the garden looked like on July 15th. It is really flourishing!
So far, we have harvested radishes, beets, mesclun, bell peppers, jalapeño peppers, and A LOT of squash and zucchini and we mean a lot (well over 100 to date). And the squash and zucchini are growing unbelievably fast and large (up to 8" per day and 24" long is not uncommon). We have eaten a steady diet of our vegetables for over a month now. What ever is too much for us to eat we either give away to friends and family or can or freeze for future consumption. Our goal is to be eating from our garden until next June when the spring harvest begins again. Here are some pics of our preserving thus far.
 |
| Farmers in training Rob and Catie modeling the zucchini they picked |
Just last week the wild flower cut garden outside our kitchen window began to bloom. There are dozens of varieties to pick from. Each day when I come home from work the house smells of fresh flowers and I find a new arrangement in every room. It's like we have a contract with a florist except our florist is free! We have another large cut garden inside the vegetable garden that will begin blooming in a few weeks. The flowers in that garden are different varieties than the cut garden pictured.
Our next post: Den, pool, siding and paint! Stay tuned.
#hgtv #diynetwork #fixerupper #countylivingmagazine #thisoldhouse #farmhousetours #countryhometours