

It has been four months since our last post and boy have we been busy! So busy, that it has been tough finding time to update this blog (which many of our readers like to kindly remind us). As of this post, only two rooms remain in the farmhouse to be completed (the master bedroom and master en suite). As we complete each room, we continue to astonish ourselves with the outcome; largely in part to Abigail's innate design abilities and vision. Words cannot describe how excited we are to spend and host the first holiday season in our beloved farmhouse.
Without further adieu...
Our Office / Den from start to finish


From the pictures above, it is easy to see why our Den has quickly become one of our favorite rooms. It wasn't always... The pictures below show how the same room looked two years ago when we bought the farm house.

 |
| Those boxes were our new kitchen cabinets. |


Since there are beautiful views in the front(the pond) and rear(the pool and meadow), we decided to eliminate the small windows and replace them with twin french doors on each side of the room to provide a wonderful view and allow more natural light into this very dark room.


The wood burning stove came with the house. For now, we have decided to remove it, but have yet to decide whether we will line the chimney for open wood fires or for a wood burning stove like this one (or perhaps we will use this one after all).


There are two accent walls in this room. I mean really, did you think Abigail was going to let me get away with simply painting the walls? HA! Though all of our different accent walls and ceilings are extremely time consuming to build, the results speak for themselves in the end.


Next up... Accent wall 2 of 2, which once again, has proven to be worth the trouble. This time...Homemade ship lap!


Abigail and I agonized for over a year as to what type of flooring we wanted in the office. We steered away from any type of hardwood since we did not want to compete with the original 200 year old floors throughout the house. We considered custom pattern carpeting but knowing that we are animal lovers and intend to always have dogs, as well as, being aware of our own dirty farm shoes from time to time, we scratched that idea. Finally, we stumbled on the idea of using brick. We loved the idea, however, full bricks would reduce the ceiling height more than we wanted and the radiant heat would be less efficient. As we continued our search, we came across faux brick veneer which was only 1/2" thick and made for interior floors. We knew we were on the right track but both agreed that it didn't seem right using a fake manufactured modern brick for this floor. It just wouldn't do our farmhouse or efforts justice. Fortunately, we discovered a company which specializes in reclaiming brick from historic buildings in Boston, MA. They then wet saw each brick to 1/2" thick and sell them as brick veneer for our exact purpose. We were beyond excited. Below is a excerpt they sent me about the history of our order:
Mill Blend Brick Story
"Our New England Mill Blend, thin brick veneer, contains a well sorted color palette that was taken from the largest textile combine in New England, the American Woolen Company Mill. This historic 5000 sq. ft. mill was originally established in 1899 under the leadership of William M. Wood. After a lively history of consolidation, changes in the textile industry, and fires, the mill complex was purchased in 1986 for $2 million by Barry Lewis. The complex housed approximately 90 tenants by the late 1908’s including mechanics, musician’s and artists. A fire in December 1989 destroyed the majority of this historic mill complex, leaving only one remaining building intact. Another fire in October 2001 heavily damaged this two-story building that has served as the offices for American Woolen and Riverside Mills. With a focus on sustainability, Stone Farm has salvaged this brick, sliced it into a thin veneer and created a product that is popular among many as an interior application containing both vintage and modern design elements."
 |
| The tractor trailer would not come up our driveway so we transferred the pallet to our pickup truck. |


After testing a few pattern we decided to use a herringbone pattern (the most difficult, no surprise there!) Laying the brick was painstaking and time consuming.


After the bricks were laid, we consulted a few experts on which mortar to use and how to obtain the dark color that we desired. Applying the mortar was equally as difficult and exacting as laying the brick was. First, we applied a small section using a mason pastry bag and then we carefully pointed each joint with a trowel and butter knife, being very careful not to get any of the dark mortar on the porous face of the brick.

 |
| Halfway through pointing the brick floor |
 |
| We installed a floor outlet where the desk will be for a lamp and computer |


What separates this from being just a simple wood door is the corrugated metal. After carefully measuring, two panels were cut to fit the door.


The door was coming together but was not quite the look we were going for. It looked too new and did not fit the room. Corrugated metal has been a popular roofing material on farm out buildings for its durability and slow aging. Salvage yards charge a pretty penny for reclaimed metal roofing that has been nicely aged with time. In order to achieve the reclaimed look of old metal we used a trick that we found on the internet. Muriatic acid is typically used to etch concrete and is extremely corrosive. It also works well to age galvanized metal in a matter of seconds! Using acid proof gloves, I sprayed each panel and then washed them off with a garden hose about 30 seconds later. The result is metal panels that look like they are 200 years old!


Here are a few pictures of the finished office, which we are already using almost daily.


 |
| This is a queen sleeper sofa |


Our Federal Wood Stove and Chimney Lining
We were lucky to have inherited this Federal cast iron wood
stove with the purchase of the farmhouse. Since I had to move it around during
this project I can tell you that it is HEAVY! We did some research and found
out that the stove was manufactured by Dutch West India Corporation in the late
1970's or 1980's (not exactly what we were expecting). One interesting tidbit
with these units is that it can be used for coal or wood, aka dual-fuel. As you
can see, it sits in the original huge kitchen cooking fireplace that still has
the swivel iron pot-holder arm. After doing a ton of research on fireplace
draft requirements and fireplace efficiency science, it became clear that a
wood burning stove is a wise alternative to keeping it as an open fireplace.
Due to the immense size of the fireplace, the required flue for proper draft
would be just about the entire area of the chimney (36" x 13" inside
dimensions!) If we decided to restore it to an open burn fireplace, it would
only serve two purposes 1) to cook our soups over the fire and 2) to create an air
suction vortex that would quickly suck all of the heat OUT of our home!
 |
| A photo from our first viewing of the home before our purchase |
The picture above was taken on the very first day we saw the farmhouse. We immediately fell in love with this fireplace. The hand hewn mantle and custom stone work make it easy to imagine previous owners cooking their meals while huddled around the fire nearly 200 years ago. The kitchen and this fireplace, we believe, are the oldest structures in the house.
Our first course of action was to repair the deteriorating chimney and install a liner. There are four very large chimneys in the farmhouse and none have ever had a liner. A flue liner is a secondary barrier in a chimney that protects the masonry from the products of combustion, helps prevent flue gases from entering the house, and reduces the size of an oversized vent (which may cause over-drafting). Flue liners have been required by building codes in the US since the 1950s.
We started by inspecting the chimney, clearing any loose mortar from the joints, and removing the bird screen that had been installed in the top course.


As you can see, the chimney has seen better days. The picture above is a look down the chimney. I climbed all the way down inside the chimney to inspect the mortar joints with a miners light strapped to my head, which was quite a sight I'm sure. Luckily the joints below the roof line remain in good shape so I did not have to re-point them in that tight space. You can see from the picture how aged the bricks are from 200 years of rain, however, it is a true testament to the original masons quality of work seeing how straight each and every brick has remained. The joints above the roof line, however, that have been exposed to the elements, did not fair so well. My dad and I prepped the chimney by scraping out all loose mortar.
As with everything we have done, we researched proper restoration practices to make sure we were giving proper historical care to our old farmhouse. Typically, modern brick is pointed with a mixture of Portland cement and sand to create a very hard cement. In our research, we learned that masonry practices underwent a tectonic shift in the 1930s. Brick became harder and more rigid, as did mortar. Pre- 1930's brick and mortar was much softer and allowed for more expansion and contraction. Many people make the mistake of using hard modern cement when they re-point old brick. This can cause the old soft brick to crack and crumble over time since the mortar is unforgiving. Traditional "soft" mortar pre-1930 was primarily made out of limestone and sand. We decided to use a hybid mix of 1 part Portland, 2 parts limestone, and 2 parts sand. This resulted in a softer mix, yet retained some of the added advantages of modern Portland cement.


 |
| Just like icing a cake... which some of you know, I have had practice with that skill as well! |

Then it was time to cap and line the chimney.
Disclaimer: Every chimney job requires a specific liner; including the type, size, insulation, cap, damper, etc. It is crucial that it be done correctly and with the proper supplies. There is zero tolerance for error when you are dealing with exhausting combustible and/or noxious fumes. We verified our plan with many experts and paid a little more for the supplies because the supplier we chose provides unlimited expert consultation throughout the installation process. Chimney installers charge a ton of money and for good reason. Do not attempt to line your own chimney with out consulting with a expert each step of the way.
Since we are using the existing wood burning stove, the flue calculations were easier than it would be if it were to be an open wood burning fireplace. The manufacture of the stove has already done the drafting calculations for us and provided a 6" diameter exhaust on the top of the stove. Therefore, the flue needed to be 6 inches in diameter all the way up the chimney with no changes, gaps or cracks.
We used a flexible, yet extremely strong, 6" by 20' long stainless steel flue that is engineered exactly for this application. First, we unrolled the flue straight and then wrapped it in 1/2' fireproof insulation using approved spray adhesive and heat tape.


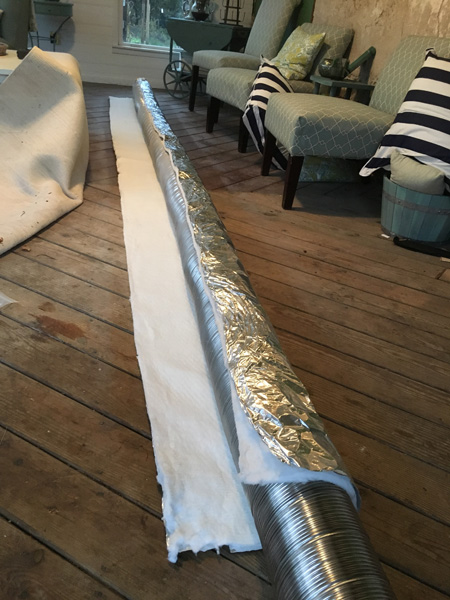
Next, we covered the entire flue in wire mesh and clamped it at both ends to protect the liner and the insulation from any abrasion against the interior brick over time.
 |
| I was getting ready for my new job at Medieval Times |
 |
| Yup, rain doesn't stop us! |

 |
| We were tempted to leave it like this in honor of Dr. Seuss! |

The final product of the chimney is pictured above. The chimney pan was custom made by a metal shop to fit our chimney. This will keep the inside dry and free of debris. In the future, we will re-flash where the chimney meets the roof with proper metal or copper flashing. At some point, someone used roofing material and tar. It is doing the job for now but eventually we will correct it.
The next part of the project was to work on repairing the damper and wood stove. Both were in bad shape.


We removed the existing steel damper and cleaned up the rust and debris. Then, we repaired the rotted area of the damper with a piece of steal and concrete.


After reinstalling the steel damper plate we cut the existing hole wider to allow the new liner to pass through it.

Next, my father and I worked on repairing the wood stove. It was in desperate need of some TLC and the critical "bypass damper" inside was broken. We set up a dust tent and got to work.

 |
| My dad grinding out rust and prepping to install the bypass damper swivel pins that he made |


Pictured above, is one of the installed pins on the left and a new gasket rope around the bypass opening. The bypass gate was then installed with the swivel under the pin on the left and the second pin was installed on the right. If you are curious what a bypass damper does and why this was such a critical repair, you can read the next paragraph, if not feel free to skip it.
Throughout this process, we have learned a tremendous amount about how a wood burning stove actually works and find it quite interesting. There is far more to it than just setting wood on fire and letting it burn. Here is a short explanation of the purpose of the bypass gate. In the picture above, there is a rectangular hole (the bypass gate) that is a direct opening to the fire chamber. Directly above the bypass damper is the flue, which allows the draft up an out of the chimney. The actual bypass damper is not pictured but it is a steel door that covers the rectangular hole. When the bypass door is opened it is rotated up which directs the flue gases from the fire chamber directly up the flue and out of the house. This is ideal when you are starting the fire or want to open the door so that smoke does not back draft into the house. Though it is important for those reasons, having the bypass damper open during normal operation is extremely inefficient in producing heat because most of the heat is immediately lost up the chimney. Now here comes the fun part for all you science nerds... Once the temperature in the fire chamber exceeds 500 degrees Fahrenheit the bypass door should be closed. Closing the bypass damper redirects the combustion through the center hole (pictured above with all of the small holes). This forces the gases to pass though the "catalytic combustor" (pictured below). The combustor, through chemical catalysis, breaks apart the molecular structures of unburden particles. Platinum and/or palladium atoms that are in the honeycomb cells trigger the chemical reaction by lowing the "light off" temperature by almost half. The catalyst converts smoke into water vapor, carbon dioxide, and HEAT. The result... the temperature inside the wood stove instantly sky rockets to temperatures as high as 1,600 degrees. This not only increases the heat but also dramatically increases the efficiency since the byproduct of the burning wood is reignited and burned off before leaving into the flue.

The next step was to install the black pipe that connects the stove to the flue. We also installed an optional, but highly recommended damper. This damper further increases the efficiency during slow and overnight burns by forcing the heat to be retained in the stove.


The stove was definitely in need of some TLC on the outside, too! We cleaned the stove up and applied a stove polish paste. This was slow and tedious work but in the end the stove looks new.


Then, we sealed all openings and cracks with a black furnace caulk that once heated becomes one with the metal.
 |
| This is me wearing my headlamp |


The finishing touch was the purchase of our EcoFan. This fan is nothing short of magical. It requires no plug or batteries, only heat and the best part is it is completely silent. The hotter the stove gets, the faster the blades spin, up to a maximum volumetric flow of 150 cubic feet per minute. The Ecofan generates its own electricity through the difference in temperature using a process called thermal bridging. The bottom half is separated from the top half by an insulated medium such as silicon. The top half is one large heat sink and as the fan draws cooler air over the fins it further energizes the motor. Ecofan ran a controlled test in a 62 degree room with and without the Ecofan. With the stove at a constant 400 degrees it took the room without the fan 110 minutes to reach 68 degrees. The room with the Ecofan reached 68 degrees in only 62 minutes!


Here is a quick video that I had recorded to send to my dad demonstrating the fan in action.
 |
| We have already enjoyed many fires and know that our propane consumption is way down. |
Custom Build Cedar Kitchen Hood Cover
In one of our previous posts, we installed the kitchen hood with a 6" exhaust to the exterior. Finally, we found time to build a custom cedar cover to compliment the beautify of our kitchen and match our cellar door in the kitchen.

You can see from the pictures below, we really mean from scratch. Tongue and grove cedar planks were used and built up row by row, using the hood as a guide for when to reduce the size. We think that the design we chose is simple yet chic. The pictures below narrate the project well enough on their own.
 |
| Please ignore the new siding and trim in the background! A sneak peak at part 2 of this post |

 |
| Finding the correct angles required trial and error |
 |
| We dry fit the hood after each row to measure for the next |
 |
| Minimal putty and sanding |


For now, we are letting the cedar acclimatize. The wood will begin to slowly darken as has the cellar door over time. Next year, we will finish and seal both with a natural wax.
To be continued in Summer / Fall Part 2 of 2 (Exterior Siding, Bee Keeping & Swimming Pool) Stay tuned!
#hgtv #diynetwork #fixerupper #countylivingmagazine #thisoldhouse #farmhousetours #countryhometours