Lincoln Quote

Lincoln Quote

Tuesday, April 28, 2015

Mission accomplished... and bones...


Now that we have your attention with the bones that we found, (we'll explain later) here is the latest from our farmhouse.

In our last post, we expressed hope that our next post would be about passing all of our rough inspections and beginning finish work.  Fortunately, we passed all of our rough inspections!

In a twist of fate (call it luck or good karma), we asked a friend if they knew a local plumber to help us fix our mistakes and he recommended a plumber, Mike Costa.  It turned out, I went to high school with him.  Not only is he a great guy but he also gave us a great deal and we had fun as we worked.

Here are a few highlights of his changes...

He was able to bring all of the waste lines to one side of our kitchen column to reduce the size of our sofits

We had to cut out a bunch of our original work... but it was worth it.
Mike used a "beast mode" hole-saw to make way for a double vanity
He left the water lines up to us to save us money
Thank goodness for Pex because copper would have taken four times as long

We tackled quite a bit more than the pictures above but we can excitedly say that we passed plumbing inspection and building inspection, soon after! We currently have all four rough inspections!


Basement

Onto the basement.  In our last entry, we showed how we had to dig down 14" through solid shale in order to finish our basement so that we could have a ceiling height of 6'6".  Below is the building science we followed to ensure that our basement would be a dry and worry free space.


The pictures below speak for themselves.

We enlisted lots of helpers to finish digging the basement.  It was a huge job to say the least!

Once the basement was at the appropriate level, we dug eight footings (the round tube in the picture). This wasn't required, however, many of the 200 year old beams are badly compromised and we are not cutting corners.  We want a 200 year old "new house!"  Also, in this picture, you can see the temporary stone shoot that we set up to deliver the massive amount of stone into the basement for the underlay/drainage.


Once we had 4" of stone laid and leveled, we used a gas powered tamper to compact and further level the stone.  If we didn't do this step the future concrete pad would settle and crack.
The next step was to insulate the floor and walls with 2" XPS ridge foam.  It has an R-value of 10 and is semi-impervious to water.  Once all of it was installed, we taped all of the seams with tape specifically designed for the foam board.


Above is the final product of insulating the basement and our vapor barrier.  The next step is to lay a grid of re-bar and run loops of Pex for radiant floor heating before we are ready for the concrete slab pour.

While I was hard at work doing construction in the house, Abby was hard at work outside now that it is getting warmer.  She has worked tirelessly many week nights and weekends to begin the process of bringing this once beautiful farm back to life.

Landscaping

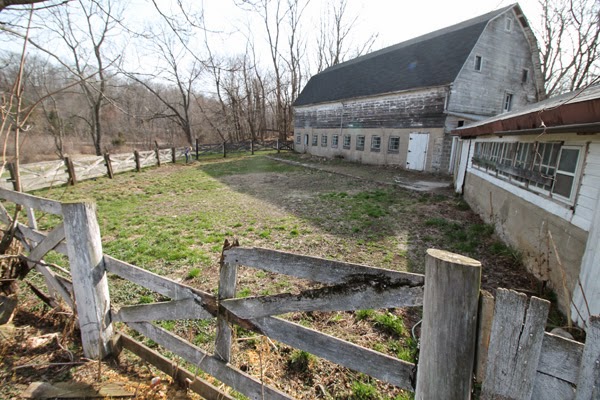
First on the list was the main barn so that we can use it as a dog run for our energetic dogs, Doodle and Jack. With the help of Abby's parents, we raked and seeded the horse pen. The horse fence was in pretty good shape with the exception of a few areas which we replaced. Below are some photos of what it looked like before we got started on this huge project.


Time for power washing and priming! Go Abigail!


Next up... gardening.  Luckily, Abby and her parents have the greenest of thumbs.  They transplanted hundreds of flowers from around the farm.  Slowly, but surely, our farm will be magazine ready if Abby has her way.


Without further adieu is the teaser of the post.  While working in the horse pen, we removed a large pile of dirt, which turned out to be a burial site of a horse.  We had a brief funeral for Mr. Horse and then removed the bones.


Finally... The finish work begins!

Kitchen

Once we received all four rough inspections, we chose to begin the kitchen. Like everything in our pre-civil war house, we had to do a ton of research in order to do things correctly.  The kitchen sits on a "crawlspace" but there is only about 3"-5" of "crawlspace".  Insulating and moisture mitigation is crucial and a bit tricky.  In the end, we wound up using cellulose on the 12 inches nearest to the outside wall since it is far more resistant to moister than fiber glass insulation.  We cut pieces of 2" XPS foam as a backer and additional vapor barrier before continuing to insulate the rest of the floor with thick fiberglass insulation which covered the entire cavity.  Disclaimer: for anyone who really understands building science, we understand that this alone will not eliminate the potential for a sub floor condensation problem.  We will also be installing 2" XPS R-10 sub grade and 2" polyiso r-13 above grade insulation on the entire exterior.


Cellulose with XPS backer
Finished insulated floor

Now for a teaser of things to come...  It is so exciting to be installing new Sheetrock and floors.  With each day that passes we can see our final vision coming to fruition.  Here are a few pictures of the installed sub floor and Sheetrock.  The purple is water/ mold resistant for the new half bath.


Just seeing the various electric and plumbing leads ready to accept our appliances has us ecstatic. 

As long as this post was.... there is so much that we left out.  We will try to post more frequently in the future because things are starting to move quickly!


Tuesday, April 7, 2015

On the brink of finsh work

Once again, it has almost been a month since our last post.  Understandably, work has taken precedent over documentation of our blog.

Here is the long and short of it:  Since our last post, we have been working on passing rough inspections: electric, plumbing, fire and building.  We need to pass the first three and then we can schedule the building inspection.  As of this post, we have passed two of three (electric and fire).  If you are the one subscriber who has actually paid attention to detail, the following won't be very surprising to you.  I am very confident and proficient when it comes to electric.  Plumbing... not so much.  We have won over the inspector and he is on our side; though he gave us an amazing backhanded compliment... "I give you so much credit. This is the best homeowner plumbing job I have ever seen in my 25 years as an inspector... in which I really truly believe it was done by the homeowner."  Thank you, I think? :)

Since inspections take time to schedule we have stayed busy on other projects.  The biggest of them all is the basement floor.  We want to have a finished basement for a few reasons: 1) Radon- We are in the radon capital of the world.  I asked the inspector if he was going to do a radon test.  His response was "Yes, I will do it right now (two second pause). Test complete....your radon level is very high; no charge for that."  2) Moisture control- We don't want a damp musty basement.  3) Playroom and storage- It is a large space and will work well for a play room for our pretend future children.  

The issue with the basement is the floor to ceiling height.  The original height with the dirt/coal/shale floor was 6' as you can see from the picture below. (I am 6'2")


It took the entire month of March, a jackhammer, and a lot of workers/helpers to remove 16" of dirt and shale using spackle buckets to carry outside.  The goal is to have a finished concrete floor with a ceiling height of 6'6".  There will be 10 inches of new material: 4" of stone, 2" XPS insulation foam board, vapor barrier, and 4' of concrete with re-bar and radiant heat.


As you can see, we are almost done digging.  It wasn't fun.  The ground is pure shale.  It is like digging out a mountain.  We had to jackhammer the shale, next pick ax it, then shovel it into spackle buckets before carrying them out to the front yard.


You can see the original floor height and the layers of shale.  We were surprised that we didn't find any dinosaur fossils :).  


We dumped the 4000+ spackle buckets out front where the yard sloped down.  Later, we will grade it and cover it with top soil.  This was an unanticipated perk because we intend to build a deck on the entire front of the house and now the slope after the deck will be much more gradual.  


A close-up of the pile.  This is what we dug out.  You can imagine how hard it was.  As my uncle says, "some people grow crops but in Northern Jersey, we grow rocks!"


Once we finish digging this weekend, we will dig footings for lolly columns that will reinforce the first floor beams which are 200+ years old.  We spoke to the inspector and he will allow 16" sono tube footings, only 1' deep, because the entire basement is basically one giant footing!  Then, we will bring all of the stone that we had delivered (above) into the basement.  Once we have a level 4" layer, we will rent a gas powered tamper and level/tamp the entire floor.  Hopefully our next post will show and describe the next steps!

Now, on to our failed plumbing inspection!  There were a handful of minor issues to be corrected and a few major issues.  The first is pictured below.  We thought we did an outstanding job fitting a 2" trap (almost everyone reading this has a 1 1/2" trap for their shower or tub) under the guest bathtub above the kitchen ceiling. Then we were educated by the plumbing inspector... the difference between a P trap (legal) and an S trap (illegal).  We originally installed an S trap which is pictured below. After learning why a S trap is illegal- it makes sense.  The end of the sideways "S" is close to the height of the drain. This could cause the trap to siphon due to an air lock and then there will not be any water remaining in the trap after use. This will make the trap useless and septic gases could seep up through the tub drain.


The next major change was capping off the dry well pipe and tying everything into the main 3" septic drain.  Wikipedia: dry well is an underground structure that disposes of unwanted water, most commonly stormwater runoff, by dissipating it into the ground, where it merges with the local groundwater.  Wow that was easy, haha. Dry wells are now illegal.  The purpose was to only run sewage into the septic and have everything else go to the dry well.  The dry well is now capped (top right of the pic below).  A new 3" Y tie-in was installed to drain every fixture to the main and bypass the dry well.    In a previous post, we lectured about the physics of plumbing and venting.  It turns out that we were operating on old science. The plumbing code has changed in the past few years due to increased water efficiency. This works in our favor, but had we know this (we consulted with a licensed old timer plumber and they did not know about the changes), we would have done many things differently.  We (under advisement) used all 2" and 3" pipe for drains and vents.  We don't regret it since more is still better in this case, but if we had used 1 1/2 the install would have been much easier!


The next issue was that the building inspector felt that the 2" drain pipe that we drilled through the new support beam (that we put up voluntarily...don’t get me started) compromised the integrity.  So we cut everything out and fabricated a new beam with no hole drilled. 


We also ran the radiant heat in the kitchen ceiling for the second guest bedroom.  This was more complicated that the others because the bays are very wide (24"+ as opposed to modern construction which is 16") and we are keeping the beams exposed.  We ran three pex lines down every bay (normally 2) so the layout took some planning.


The floor above is the oldest floor in the house.  The archaeologist raved about it so we decided to save and preserve the floor.  We had to reinforce the floor (as seen above) in many locations.


The finished product is above.  We also customized every light in the kitchen ceiling. Since we want exposed beams we needed super shallow lights.   A normal can light is 8" deep.  You can buy shallow cans which are 6" and double the price but that doesn't help us since we wanted 3" cans.  So we are using LED inserts and cut down the 8" cans to 3". We should have taken pics of the process because it was not easy and is very custom.   You can see how high the cans are mounted on the beams in the pics above.  The sheet rock will be installed between the bays leaving 4" of the 200+ year old hand honed beams exposed.

Below are pictures of the oldest floor in the house which we discussed above.  We gave it an initial sand before we installed the radiant heat plates.


Other highlights: we had to install "nail plates" on every stud where a wire or pipe was  1.25" or less. It was annoying but will pay off in the future.  This way we wont go to install crown molding and nail into a wire. We did this all over the house.  I think we used 200 1x2' nail plates and a few dozen of larger sizes.


We have also been busy getting ready for finishing work as you can see from the pic above. These are the details that take the most time!
Hopefully our next post will be of finishing work!  Stay tuned!