Now that we have your attention, lets start with the progress in the living room.
This room has evolved over the past nine months that we have owned this property. We initially thought that we were going to build custom built-in cabinets on each side of the fireplace until we discovered what a beautiful fireplace and chimney were hiding beneath so much rubble. After we decided not to cover up it's beauty, we had to devise a Plan B. We have been getting so many questions about the use of the old doors from our previous post and now you can see, our fireplace wall if evolving. After the doors were stripped of paint and stain, my wife white-washed them. The hardest part of this design, was creating symmetry with mismatched doors. After many attempts, this was our final product. As you can see, three of the doors actually had to be cut to fit this custom design, but the end result is just what we were dreaming about! However, this is not the end result. These doors are only a backdrop to what will be custom shelves that we will be building out of reclaimed wood from another part of our home.

 |
| Trying out different designs |
 |
| Surround sound and HDMI cables for the future entertainment system and TV |
We are very excited about the new light fixture that now illuminates our living room. And by "new", we mean easily over one hundred years old. We looked for months for a fixture that would compliment all of our custom hard work in the living room but had no luck. Suddenly it came to us, we would design and make the fixture from scratch! We built this custom lighting piece using a reclaimed piece of wood from our home and purchased these vintage Edison lights and reproduction antique wire and fixtures to hang from the log. We are using LED lights as well, to go along with our "energy efficient" transformation. Finding quality LED Edison bulbs proved to be a bit time consuming and costly but it was worth the effort to purchase quality. Each bulb puts out 60w equivalent of light with a energy consumption of only 4.5w! So our five lights consume about the same energy as a single 60w bulb.
 |
| The finished product.. isn't it beautiful, just kidding. |
 |
| This was an original floor joist in the house. It is a 8" x 10" and weighs about 150 lbs! |
 |
| We connected five strands of antique style cord to the switched power |
 |
| Then we, and a few helpers, hoisted the 50lbs log into place and secured it to a ceiling beam with 10" lag bolts. |
 |
| Before tightening the bolts we fished the cables into place. Once we had them where we wanted we drove home the lag bolts and installed the reproduction fixtures with chrome caps and LED Edison bulbs. |
 |
| The notches or cuts in the wood are call "hand hewn" which means they were cut by hand using a hand ax. |
Also we finished the trim in the living room and painted the accent wall
If you have read earlier posts, you know that the fireplaces in our home did not always look like this. This tedious task was something that we wanted to have professionally restored so we decided to hire an expert mason. He worked tirelessly for an entire week putting in countless hours and breathing in years of dust and history as he stripped the mortar and rock. As you can see, this is truly a piece of art all on its own and he was able to maintain the integrity of the stone and brick by using material and colors that would have been used when the fireplace was first built.
 |
| This what we found under the 2" of plaster. All of the joints still had plaster at this point. |
 |
| As you can see it has a lot of potential but all of the plaster needed to be removed brick by brick and stone by stone. You will notice the corner bricks are completely filled in plaster. Time for our mason! |
 |
| Each joint had to be pain staking ground out |
 |
| Once the joint were removed the mason re- pointed each joint. Modern brick joints are concave for a finished look but that did not come in to style until well after our home was built. Because of this we went with a flush joint which is period appropriate |
 |
| The stones were the hardest part but he did an amazing job! |
 |
| What a difference! We are so excited about this unique original feature |
 |
| We didn't even realize before what a beautiful fire box we had! |
The other chimney he worked on was in one of our guest rooms which is directly above the living room.
 |
| Our mason Ron. He is a true artist and such a nice guy. If you are in north New Jersey area and need a mason feel free to contact us and we will put you in touch with him. |
 |
| Finished but not yet dry |
Abigail and her mom have been tirelessly working in the gardens but are finally able to begin projects that can be used inside the house. Hundreds of ideas have been floating around Abigail's head for the past nine months, but the house was not ready for furnishings until now. As the excitement builds, Abigail and her mother have begun transforming the "old" and creating "new" furnishing for our home. One of their first custom projects, was to transform these old chairs that were used in the basement of our previous home and create beautiful additions to our sun room. Abigail and her mother did a project similar to this three years ago with dining chairs so we had fabric left over. Amazingly, these two stunning chairs cost NO money to transform. Now that's a dream DIY project for you!


This sunroom had once been a deck and was covered by the previous owners to be able to enjoy the serene outdoor space for more than one season. Unfortunately, this room had been filled with old furniture, knick knacks, etc. and it was left there when we purchased the home. Since we bought the home in November, it was too cold to waste time cleaning out this room so we used it as a workshop and added to the debris until Abigail and her mom cleaned it out this month. We don't have a before picture and it is probably for the best! But, as you can see, it is making a lovely transformation and truly helping this project begin to help us feel like we are finally "home".

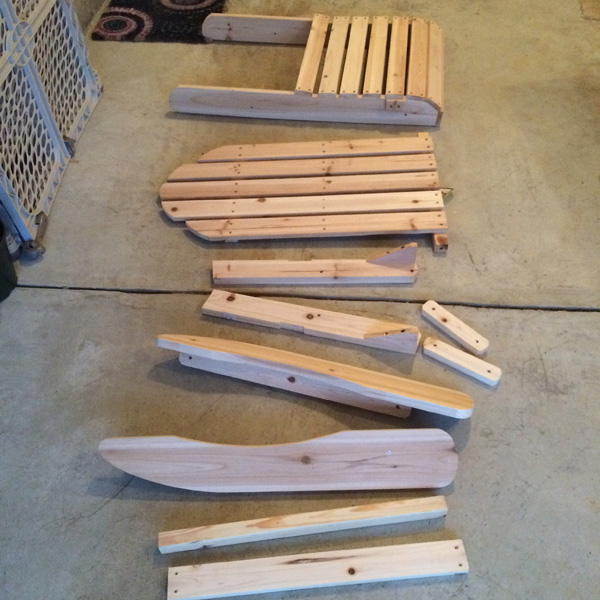
Abigail has been insisting that we would enjoy more time spent by the pond if we had Adirondack chairs. Abigail and I got engaged in the Adirondack Mountains, at the Sagamore, in Lake George. If you don't know the history of Adirondack chairs, they were created in 1903 by a man who built them for his family to have more seating by the lake. It is only fitting, that Abigail built these chairs on her own, to allow more time together as a family down by our pond. I suppose you could say, we have taken a little Adirondack history with us back to New Jersey.
 |
| The first chair! It past a "sit test" by Abigail. The best part is that all four of these chairs are foldable and can easily be put into storage for the winter! Once assembled, Abigail stained and sealed them with a cedar stain. |

Now that most of the old doors have been taken down and made into something new, it was time to frame new doors around the house. We were able to keep the existing doorways and trim for several rooms in the house, but we had to get creative for the bathroom and our second guest room. Originally, the entrance to our second guest room was only if you entered through the bathroom. Instead, we removed the existing linen closet in the bathroom to create a small hall and entrance into the guest room. This proved to be a bit tricky, because the guest room and bathroom were built at different times during the 200 year lifespan of the house. The bathroom was level with the upstairs landing. However, the guest room was on the level of the master bedroom and additional guest room. The only way to solve this problem was to create a small platform and step into the room. We wanted to maintain the integrity of the house so instead of installing new flooring that wouldn't match the existing hardwood so we installed wooden planks that were taken from our attic.


 |
| The door casing closely matches the original casings. In fact, there are still some original caseings and it is hard to tell which is original and which is new. |
 |
| The rear guestroom door was quite a challange. The wall was originally an exterior wall when the home was first built (before the addition of the guest bathroom). The walls are 8" thick so we had to build custom extention jambs. |


Who knew it could take so long to pick out a bathroom door? Abigail and I have the same vision for the rooms in our home (for the most part). Since we have added rooms and doors that did not originally exist, we have decided to add doors that fit with the style and age of the home. As stated earlier in our post, the old doors are being used in new projects, and we now have matching doors throughout the house.The bathroom door proved to be the most difficult door to find because we had wanted to get a vintage glass door. However, we had difficulty finding a door in the correct dimensions and in the type of condition we were hoping to find. After visiting several antique stores, shopping on craigslist and other online stores, we determined that we would have to order a new door and add our own custom touches to it to add to the character we were looking for in a door.
 |
| We had to trim the caseing to fit the sloped ceiling. Just adds character to an old house! |
Our guest bathroom is one of our favorite room in the house. While it isn't complete yet, it is evolving into the "rustic" vision that we had for this room. The old bathroom had a very strange layout and we were forced to flip the entire bathroom so that we could add an attached laundry room. The only problem with this design was the awkward wall that it created to divide the tub and toilet. Abigail's idea was to add corrugated metal roofing to the wall to create a divide that fit a farmhouse, rather than a wall of sheetrock that you would see in a typical "new-home build". As you may have noticed, there is nothing "typical" about this home and we don't intend to start now!
When possible we utilized the original door frames and ordered matching custom size doors to fit the old frames. It was a ton of work modifying the old frames and routering the hinges but well worth the trouble.
Many of the rooms had great base molding that was tall (which we loved) but unfortunately, as we started working on sheetrock and electric work, we discovered that the base molding did not have sheet rock behind it. Instead, it was installed flush with the wall. While we had intended to save the molding, this caused a problem and we were forced to purchase new trim.We didn't want to purchase anything that would go into a new home or wouldn't fit with a farmhouse design. Luckily, for us, we were able to find base molding that was as tall as the original and maintained the simplicity of the original molding.


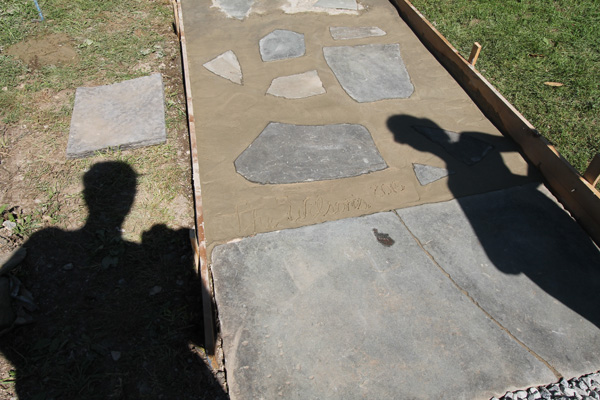
My father has been working hard on the farm's exterior to restore some of the dilapidated areas. This walkway, in particular, turned into a huge over-haul after trying to do a simple weed whacking project. The walkway was basically being held together by the grass patches that had grown in the cracks over the years. The more grass that was removed, the more we realized what a big problem and big job lay ahead. Luckily, my father is both an artist and a perfectionist! He worked every evening to remove the years of growth, debris, and used twenty bags of concrete to create a beautiful new entrance to our sunroom. It is now more welcoming and safer!
Abigail is adding the finishing touch to the walkway: The Wilsons 2015
The final project for this update is our Purple Martin bird house. We found this at a flee market and instantly knew it was a must have. Purple Martin birds are native to our area and one of the few birds that live in colonies. One of the most attractive attributes of Purple Martin is they eat bugs! Anyone that is willing to eat bugs non stop at our farm is allowed to live here rent free! The thing about Purple Martin though is that the are very particular. The bird house below is really like a 18 unit condo. Each hole is a separate compartment. Also they like their home to be high in the sky and away from predators. Eventually we will put climb guard on the pole to keep out the riff-raff like squirrels.
 |
| We dug a 3' hole by hand |
 |
| Between the house and the 16'- 6"x6" we needed all the help we could get! |
Well, that is all for now. Our next post will be... lets just say VERY EXCITING! Stay tuned.