

Kitchen Cabinets and Floor

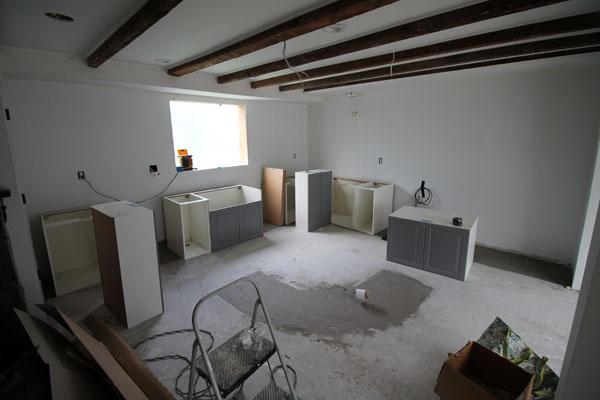
If you remember from one of our first posts, all the way back during the Christmas season, Abigail, her brother and father began assembling the cabinets because we were extremely eager. Only seven months passed before we were actually ready to install them! The only thing left to assemble was the large cabinets and all of the drawers. For that, we enlisted our friend and professional cabinet assembler, Rob Daly (Actually, he has only assembled one set of cabinets in his life, for his nana, but that was good enough for us)!


 |
| My brother, Tim, helped hang the wall cabinets |
 |
| Rob assembled all of those drawers in 34 seconds like an elf! |


In our last post, we talked about how we sometimes complete a project only to tare it out because we were unhappy with the outcome or found a better solution. Here are two more examples of this... We had installed 1/4 round molding on each side of our exposed ceiling beams in the kitchen. We even caulked and painted them, only to decide that we did not like how the 1/4 round took away from the raw look of the original beams. So, we tore our finished work out and started over. We decided to not use any molding and carefully spackle right up to the edge of the beam. We still need to remove the tape and sand the beams but we are much happier with the outcome.


The next thing we had to change was the location of our exhaust hood and electric because of a plumbing soffit in the kitchen. This forced us to start our cabinets 5" past our originally planned point.


Next up... installing counter and cabinet accent lights.
 |
| Snaking magic |
 |
| Electric transformer hidden behind the dishwasher |
 |
| Sneak preview of the lights |
We began by milling 120 - 4" x 40" pieces of hardwood out of the huge original planks from our attic.
 |
| We stored all of the material that we could salvage during demo into the pool house. Someday, we also hope to make custom furniture pieces out of the wood. |

The first step was to rip the wide planks down to multiple 4" strips. You can see from the picture below just how thick the floor boards were. They definitely do not make things like they used to anymore!

Next up was planing the wood down to 5/8" thick. This gave the wood a fresh face while producing A LOT of saw dust...


 |
| Finished planks stacked and ready to go |
Now for the "fun-stration" to begin. I have tiled many many floors in my day, none of which even remotely compare to the difficulty level of the razor thin error tolerance of this floor. After a very long day of work, the floor looked stunning. Later, we will sand the wood before applying polyurethane and then apply white grout between the tiles and wood.


Once we finish the floor we will install the island. It was no coincidence that we laid the floor in the nick of time before our appliance delivery. We also ran the water lines to the refrigerator and dishwasher. We will install our induction cook top after our counter top is installed and our convection double oven / microwave is due to arrive in the end of August.


Entrance / Hallway
The plaster in the entrance was in pretty bad shape. The years have taken its toll and there was visible crumbling and patching. We knew from day one that we would have to apply a skim coat of spackle. As I'm sure our readers know by now, we couldn't just stop there, paint and call it a day. Instead, we are installing over 600 feet of three types of molding to create custom box molding. We went with chunky 5/4" x 4" pine rather than a simple traditional box molding trim as it is more authentic to an early american farm house. We still have to install all of the 1/4 round inside the boxes, finish the cap, and continue the box molding in the second floor hallway. Once we are finished, we will sand, wood fill, caulk, install crown molding and paint the entire area white from the cap to the floor.
 |
| Shout out to Alfredo our talented trusty helper (pictured above) |
 |
| We had to sheet rock over the bead board look. What is interesting is it is not bead board. Those are actual 1" thick tongue and grove planks. There are no studs! |

 |
| Beginning to skim coat on the far right |
 |
| Finished skim coat |


 |
| Every box will have 1/4 round in it like the box on the bottom left. |
Living Room / Accent Walls
Continuing our theme of making everything difficult, we are installing a box molding accent wall in the living room as well an accent wall on each side of the chimney with built in shelves installed over top. First up was the rear accent wall. We are still in the process of completing the wall, including, installing 1/4 round in every box, installing a base molding, sanding and filling, and then the entire wall including crown molding will be painted white.
 |
| We had to remove and patch the original chair rail. |
 |
| Our good friend, Mike McGuinness, volunteered for a full day with us. It was a huge help! |
 |
| At some point in the homes history, the owner installed 3/8" sheetrock over top of the plaster. This was probably done as a quick fix for crumbling plaster. The issue is, they didn't remove any molding before they installed the sheet rock so the original molding was slightly inset in the walls. Of course, we weren't going to accept this and we have been removing the molding, installing furring strips and then reinstalling the molding so that the full original depth is shown. |

 |
| The door and base molding reinstalled over furring. |


This weekend we will finish up the accent wall.
Now on to the living room chimney accent wall. Originally, we were only going to paint each side and then install shelves. However, I received inspiration while I was recently in a jazz club in New Orleans. I sent a picture to Abigail and she also loved the idea. Behind the piano player, was a wall with shelves and behind the shelves were old doors hung onto the wall as accents. Like everything in our house, we salvaged the original interior doors, even though, we weren't sure yet what we would do with them. Let the accent wall begin!
Abigail headed this project. She worked each night for a full week in order to strip, sand and white wash the doors. There were years of paint and layers on the doors. Once the paint was stripped, there were different colored stains and dyes on the doors! She was careful not to remove all of the paint or stain, leaving accents and the history on areas of the doors.
 |
| We used a low VOC paint stripper in a well ventilated area (outside) |

 |
| We removed all of the old hardware and saved it for future use |

 |
| You can see what a task this was |
 |
| The green under the white is actually a stain or dye, not paint, so it had to be sanded. |
 |
| Always multi-tasking. (Abigail was sure to capture me on my cell haha) |
 |
| Abigail and her mom sanding the doors |

 |
| Our friend, Colleen, came to help too! |
 |
| Abigail blowing the saw dust off the doors in her fashionable construction outfit :) |
 |
| The completed prepped doors. You can see all of the different years of paints and stains which Abigail so carefully left behind for character. |
Finally, Abigail used a chalk paint to white wash the doors so that the doors would be more uniform, yet, show traces of the years of history.


The accent doors will be installed on each side of of the chimney. Then, shelves will be installed over them. Because of this, we removed the window on the left.


Guest Bath
We have also made some progress in the guest bath including the floor and prep work for the double vanity. We had been searching for month for a tile we liked for the guest bath but never could find one that we were excited about. A few weeks ago, we found it! We bought it on the spot and began to install it. It is a ceramic tile that looks (and even feels) like old aged wide plank wood. It is really quite amazing. Even the knots in the tile are slightly raised to the touch.


Below is a picture of a 2" thick slab of reclaimed wood. We bought it for $20 at an antique store. We are going to use it as the counter top for our double vanity sinks. The only problem is the slab of wood was slightly concave width wise. In order to straighten the old wood, we built a custom vice and tightened the bolts a few turns each day until it was straight and let it sit in the vice for a few weeks.


Basement Stairs
In one of our earlier posts, we showed you pictures of the original mortise and tenon stairs. Even though they are so neat, they were not practical, nor safe, so we were forced to remove them. Last weekend, we cut and installed a new stair case.
 |
| We used an online rise and run calculator to make our lives easier |


 |
| The hardest part was navigating the transition |


When we finish the basement we will build side walls and have storage cubies.
Landscaping
As always, and will be the case for the foreseeable future, there is no shortage of work outside on the farm. In order to focus on the house this year, we haven't touched any of our back fields or our side field and we let the grass grow wild. Later this year, we plan on having a large picnic and want to use our side field as a parking lot so we had to cut the grass. It was far too high for our mower so we rented a brush hog and rented my brother Tim!


 |
| Then, Abigail mowed it with our riding lawnmower (which is now her new favorite thing to do) |


 |
| My brother Tim and his unique, yet, functional weed whacking attire |
 |
| Our old homeowner special, Ryobi weed whacker, just wasn't cutting it so we bought a new professional bad boy. |
The highlight of Tim's day was when he discovered a giant paper wasp nest while weed whacking. The wasps politely asked him to leave by stinging him once of his wrist and twice on the butt.

Abigail's next project was to restore and then distress all of the wicker that we acquired from the farm. She scrubbed and cleaned the furniture and then used tan chalk paint, followed by a light coat of grey chalk paint.


To wrap up our post, we will introduce you to our elusive friend, Mr. Groundhog. It is straight out of Caddie Shack. We set up our humane trap next to his home but he is too smart for that. Each time we set up the trap, he relocates, and we see him on another area of the farm in a different hole. The gantlet has been thrown, Mr. Groundhog, and we accept the challenge.


yes i made it on the blog!
ReplyDelete